2018 Gourd Gathering July 19- 22
Class Schedule
Thur morning- Acrylic pouring - taught by Jennifer
Thur afternoon - Teneriffe with pine needle rim. Can work on into the evening. Taught by Tammy
Fri morning - Hopi Circle - taught by Ellen. This design can be done on a shard or gourd.
Fri afternoon- Luffa Gourd- taught by Tammy
Sat morning- Mixed Media -taught by Carrie
Sat afternoon- Lidded Gourd taught by Michele
Sun Morning- flower and filigree - taught by Ellen
Supply List for the Luffa Gourd
1 - 6-7" in cleaned craft ready gourd-cut, cleaned, shapes cut out
**Top hole HAS TO BE large enough for your hand to fit in!!!!!!!
2 - 7" section of cleaned luffa
3 - cut out pattern
4 - pencil, tape and scissors
5 - ink dye color of choice and supplies to apply
6 - E-6000 7 - 24" section of 1/8" braded seagrass-enough to go around the top hole 3 or 4 times.
8 - rolling pin
9 - if you have:
9" tongue depressors , 12" pc of small dowel, or a couple sticks to put pressure on luffa.
Supply list for Acrylic Pour Gourd
Two methods will be taught
Two methods will be taught
1 - Several colors of paint - Any color (Creamcote, Apple Barrel, even acrylic room paint, etc) you wish to use
Can be matte, gloss, multi surface, etc
2 - Spray varnish (your choice of gloss or satin)
3 - Floetrol (found at home depot/lowes in the paint department)
4 - Silicone oil (I use 3 in 1 Silicone oil found at home depot/lowes where you would find wd 40)
5 - 2 ounce cups (can be plastic or paper) (about 10)
6 - 6 ounce cups (can be plastic or paper) (about 4)
7 - Popsicle sticks or anything you can use to stir paint in a small cup
8 - Rubber gloves (plastic gloves)
9 - Large Garbage bag
10 - Packaging tape or blue tape
11 - 10 - 20 pebbles (or anything else to set your gourd on to dry that has minimum impact on the bottom of the gourd)
12 - 2 Aluminum pans (size = big enough to set your gourd in without touching the sides)
13 - Two gourds cleaned on the outside – either whole or cut with the inside cleaned and painted
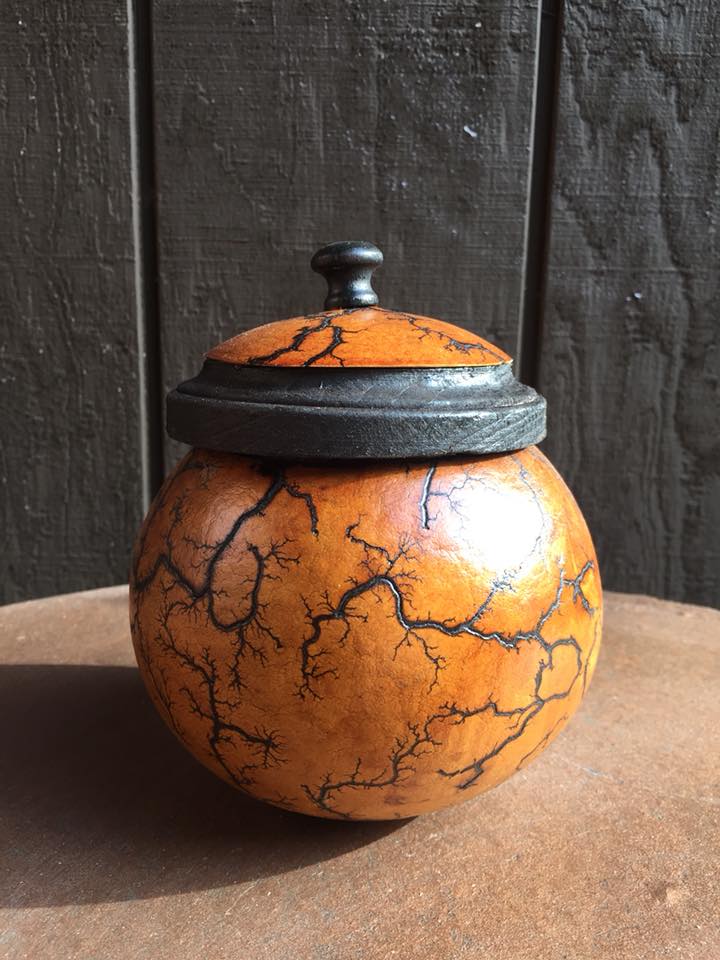
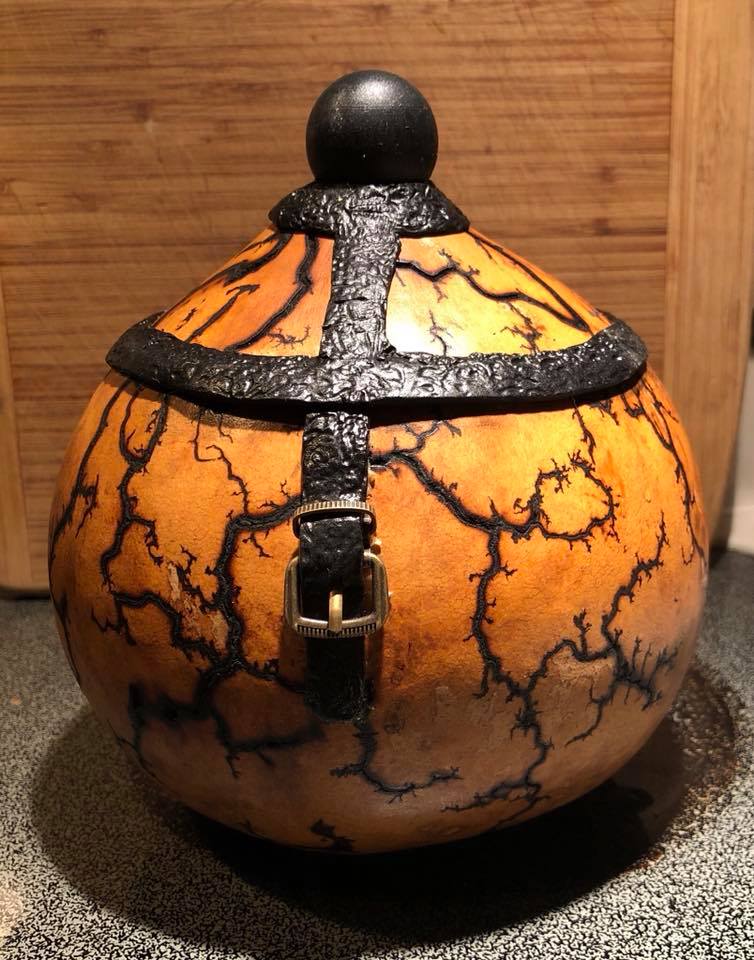
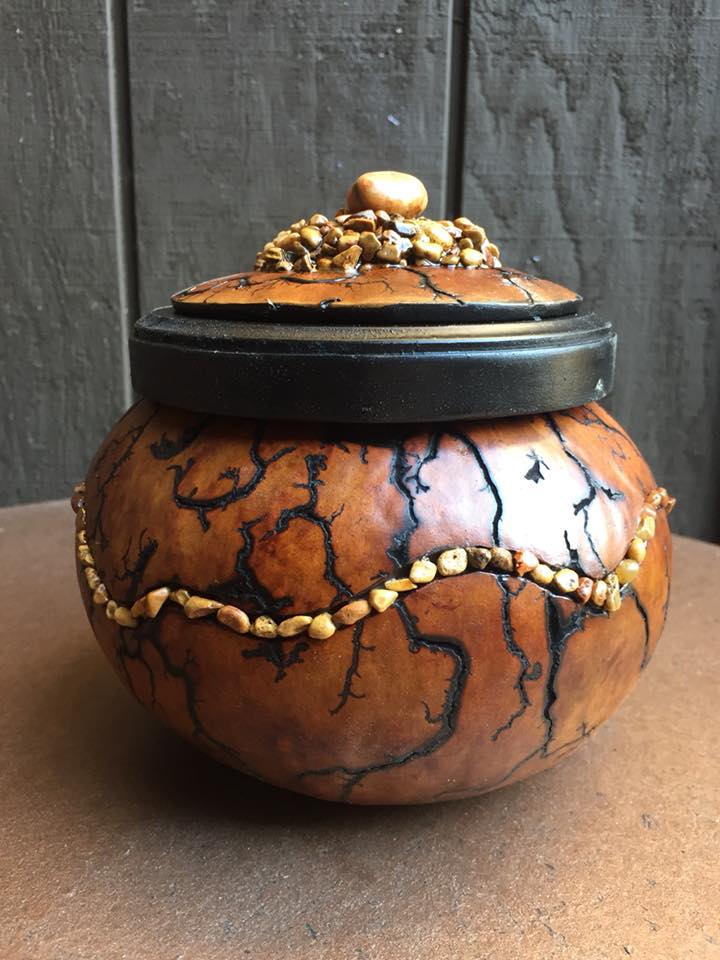
Lidded Gourd with the Lichtenberg/fractal woodburning process
Michele will be there on Friday and Saturday. She will bring the Lichtenberg wood-burning unit on both days. On Friday we can take turns Burning our gourds in preparation for making a lidded bowl on Saturday. If anyone is uncomfortable using it, she is happy to do it for you.
Supplies needed:
1 - Cannonball or small canteen gourd
2 - Black paint – either spray or bottled
3 - Alcohol inks or wood stain if you want to alter the color of the gourd surface.
4 - Wooden knob
5 - Sheet cork or cork coasters
6 - Rubber cement – Michele prefers E6000
7 - Mini jigsaw or carving tool to cut round circle for lid of gourd
8 - X-Acto knife for cutting cork
9 - Air dry clay if you want to add the faux leather trim
Michele will bring some wooden lids that she has been using to make her bowls that are much easier to use than trying to cut a wooden circle out of a piece of plywood. She will also bring some extra wooden knobs and sheet cork if anyone has trouble finding these items.
Kumi loom Supply List
1 foam kumi loom can be found at Michaels fairly cheap.
Plastic rings to wrap thread around. Can be found at Michaels or any gourd supply site. If you can’t find these you can make do with empty thread spools, toilet paper tubes, using either paper clip, tape, or rubber bands to hold.
And any type of yarn, ribbon, embroidery floss etc you want. Different sizes, weight, or texture. doesn’t matter it just adds to the design so get creative.
You can add beads also just make sure one type of thread fits through bead hole. I’ll have samples (if I can find) and the book and several types of ribbon, embroidery floss, yarn to share. The finished piece could be used for rim on a gourd, for a necklace to hold a gourd pendant, a strap for gourd purse, endless possibilities.
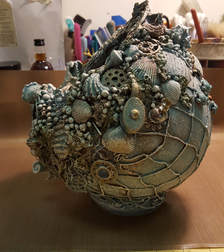
Mixed Media Gourd Supply list
To help prepare for the Mixed Media gourd, it is recommend that you visit YouTube and watch a few videos on Mixed Media and how it is put together. You will see a lot where they apply this to canvas and that is fine; it will help you to understand what is applied first.
You can bring a plain gourd with no dye or dye a gourd and add your Mixed Media to it. No matter on shape or size or type of gourd; it is all up to you!
Typically you decide on a theme and a focal point on your gourd and then you apply background first (stencil patterns, doilies, lace, netting and then work up from there.
What is important to understand is to disregard the color of the items that you are applying because once you reach a point of attaching items you will paint them all one color and then “bring them back to life”😊
Tammy has made up some homemade texture paste, rust paste and gesso and will bring it to share. You do not need to buy much because often you can just use what you already have in your stash/craft room. There is no right or wrong way to do this and we can all share with this fun project. Have fun with it and use your imagination!
Item suggestions to use for Mixed Media:
It’s all about texture!
Stencils, Doilies, doily pieces, lace molds, lace, flowers, butterflies, burlap,
Drywall tape, netting, fish net (Carrie will have extra if you want to do a nautical gourd) gauze, twine, stems, twigs, buttons, craft foam, sisal
Paper, maps, tissue paper, foil, napkins, cheese cloth, string, thin wire
Cardboard- corrugated- chip board die cuts, mechanicals, metal pieces (gears, nuts, bolts, screws, wire, metal butterflies, flowers, bees, sea shells
Nuts, bolts, nails, screws, springs, small light bulbs, keys, broken jewelry, game pieces, Legos, puzzle pieces, small pebbles, art stones, seed beads, micro beads, glitter, gears, watch parts.
• Keep in mind that things can be made to look like metal without actually being metal; you could cut your own gears out of thin cardboard and coat them with rust paste and hey will look like metal😊
Art supplies:
Paint brushes, acrylic paint (black/white), paint that you want to use for your particular gourd if it is different from black or white, such as nautical theme can be “under the sea” color), waxes, colored metallic waxes, pigment powders/ mica powders, pigment sprays, modge podge, stiff stuff (Stiffy), glue, E6000, hot glue, gesso
Tools: hot glue gun, palette knife, blow dryer or heat tool (blow dryer is best, you don’t want to melt your glue)
Hopi Circle with Pine Needle Rim Supply list
Gourd Shard in the shape of a circle. The flatter the better. Size depends on the size of tray or wall hanging you want to make. You can also do the design on a cleaned gourd. The third circle is the feathers but the two inner circles can be whatever you want. I’m going to do mine on a gourd with the center cut out so I can do a dream catcher.
Wood Burner and tips
Pencil & eraser
Compass to make circles – or circle templates
Sand paper
Drill w/drill bits – holes to coil into
Wax thread (linen, cotton, artificial sinew) in the color of your choice
Pine needles – can be hard to obtain on short notice. Alternate method would be to coil the thread around a clothes line rope or paper craft rope, anything like that)
Beads optional
Needle big enough for your thread
Scissors
Small plier help to pull thread through the needles
Dyes if you want to add color
Flower and Filigree Supply list
Small cannonball or other small gourd – small hole cut in bottom (about the size of a birdhouse hole) and the inside cleaned.
Rotary Carving Tool
Rotary Drill bits – carving and sanding
Pencil, Eraser, Ruler
Rotary Carving Tool
Rotary Drill bits – carving and sanding
Pencil, Eraser, Ruler
Teneriff Gourd Supply List
Gourd-cut, cleaned, finished, sealed and holes drilled (large enough so your needle and 2 pieces of wax linen will fit through) This class is concentrating on the teneriffe and getting it attached to your gourd with pine needles and wax linen!!
pine needles
wax linen
20 gauge needle
scarp scissors
small wire circle-possibly a key chain??
pine needles
wax linen
20 gauge needle
scarp scissors
small wire circle-possibly a key chain??
